Idea: Introduction to Angular.
Background: The Ultimate Angular-cli Reference and Mindspace: Angular 2 Tutorial - Complete Introduction - Angular 2 CLI Setup, ...
Idea: Introduction to Angular.
Background: The Ultimate Angular-cli Reference and Mindspace: Angular 2 Tutorial - Complete Introduction - Angular 2 CLI Setup, ...
What is Angular?
Angular is a platform that helps you create advanced single-page (SPA) webapplikations in HTML using Typescript (ES5 or Dart).
In this exercise you have to build your first Angular App in 10 steps
Step 1 - Install Angular-CLI
First you have to verify that you have a propper version of Typescript installed:
Open a terninal window an run: tsc -v (current version : 4.2.3 - 06. April 2021).
If you have an old version, you can update by running: npm update -g typescript.
If you don't have Typescript installed, you can install with: npm install -g typescript
Then you can install the CLI with the following command: npm install -g @angular/cli
This should install the Angular CLI globally.
Verify that Angular CLI works by running: ng version (current version: v11.2.7 - 06. April 2021)
Step 2 - Create a folder to your Angular projects (eg vscode/angular)
Step 3 - Create a new Angular project - MyFirstAngularApp
Open VSCode.
Open your new Angular folder (File -> Open Folder)
Open
an integrated terminal window in VSCode (View -> Integrated Terminal)
Create a new project by running: ng new MyFirstAngularApp in the terminal window.
? Do you want to enforce stricter type checking .... ? Type 'N' - we don't need yet!
?
Would you like to add Angular routing? Type 'N' - we don't need routing yet!
? Whitch stylesheet format would you like to use? Type return (just select 'CSS')
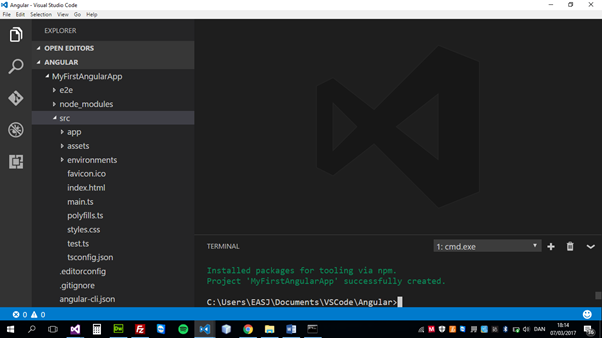
When the creating has completed (this may take a while) you should have something like that:
Notice:
Do you get an error like: ng : File C:\Users\EASJ\AppData\Roaming\npm\ng.ps1 cannot be loaded. The file
C:\Users\EASJ\AppData\Roaming\npm\ng.ps1 is not digitally signed
Fix: Run: Set-ExecutionPolicy RemoteSigned -Scope CurrentUser then try ng new MyFirstAngularApp again.N
Step 4 - Run the server
Navigate to the new project folder by running: cd MyFirstAngularApp
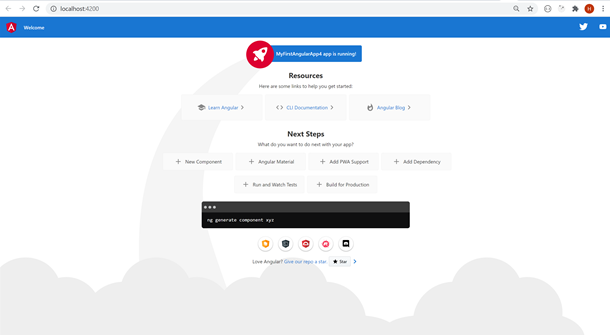
Verify that the application works by running: ng serve -o
And verify that you get something like this:
Step 5 - Change the text
Open
app.component.ts and change the value of 'title' to your name.
Open app.component.html delete all the default code in the file and insert:
<div style="text-align:center">
<h1> Hello {{title}} </h1>
</div>.
Notice: live update in the browser
:)
Stop the Server: Ctrl + c
Step 6 - Create a new component
Create a new component myImage by running: ng generate component MyImage (or just: ng g c MyImage)
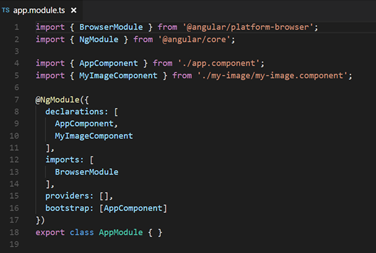
Notice: The import of 'MyImageComponent' and the declarations of 'MyImageComponent' in @NgModule
'Component' is automatically appended to the name of the component.
Step 7
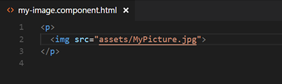
Copy a image/picture of you into the folder: assets
Step 8
Insert your image in the my-image.component.html file, like:
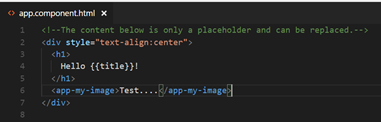
Step 9 (app.component.html)
Add the <app-my-image> tag in the app.component.html file, like:
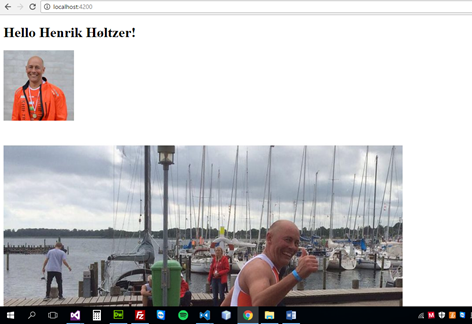
Step 10
Start the server again by running: ng serve to watch the result. It shoud look something like this:
Congratulation! - Angular is rocking and you have made your very first (and very small) Angular 11 App.
/ Henrik H