Idea: Introduction to Angular (component, bindings).
Background: The Ultimate Angular-cli Reference and Angular.io
Idea: Introduction to Angular (component, bindings).
Background: The Ultimate Angular-cli Reference and Angular.io
In this exercise you have to build a simple calculator in 10 steps
Step 1 - Create a new Angular project - SimpleCalculator
Open VSCode.
Open your Angular folder (File -> Open Folder)
Open
an integrated terminal window in VSCode (View -> Integrated Terminal)
Create a new project by running: ng new SimpleCalculator in the terminal window.
? Do you want to enforce stricter type checking .... ? Type 'N' - we don't need yet!
? Would you like to add Angular routing? Type 'N' - we don't need routing yet!
? Whitch stylesheet format would you like to use? Type return (just select 'CSS')
Step 2 - Add Bootsrap to your project
Open the index.html file and add Bootstrap to your SimpleCalculator project by adding the following lines in the header:
<link rel="stylesheet" href="https://maxcdn.bootstrapcdn.com/bootstrap/4.5.2/css/bootstrap.min.css">
<script src="https://ajax.googleapis.com/ajax/libs/jquery/3.5.1/jquery.min.js"></script>
<script src="https://maxcdn.bootstrapcdn.com/bootstrap/4.5.2/js/bootstrap.min.js"></script>
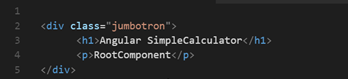
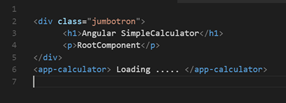
Step 3 - Add a Jumbotron to the component.html file
Open
app.component.html and replace the default html code with the following code:
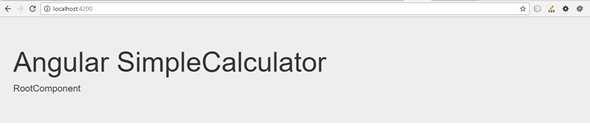
Step 4 - Run the server
Navigate to the new project folder by running: cd SimpleCalculator
Verify that the application works by running: ng serve -o (-o opens and browse your application in your default Browser)
Verify that you get something like this:
After verification - stop the Server with: Ctrl + c
Step 5 - Create a new component
Create a new component Calculator by running: ng generate component Calculator (or just: ng g c Calculator)
Notice: The import of 'CalculatorComponent' and the declarations of 'CalculatorComponent' in @NgModule
'Component' is automatically appended to the name of the component.
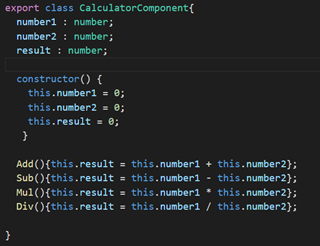
Step 6 - Implement the CalculatorComponent class in calculator.component.ts
The class should have 3 properties: number1, number2 and result (all of the type number) and 4 functions Add( ), Sub( ), Mul( ) and Div( ) that uses number1 and number2 to calculate and update result.
(The lifecycle-hook: ngOnInit can be removed - it's not used in this case)
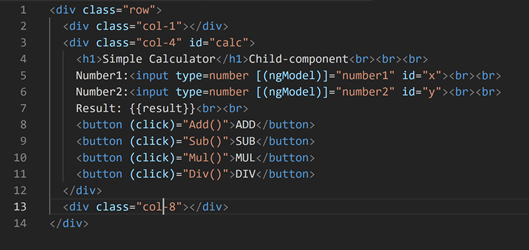
Step 7a - Create the template to the new component (calculator.component.html)
Add to input-fields of the type "number" and make a two-way binding between the input-fields and the number-properties in the component class
(used to update the view-model from the view (the template)).
Hint: [(ngModel)]="Property".
Use interpolation {{ }}
to make a one way binding from the result-property in the component and the DOM (in the template of the component)
Use event-binding to bind the functions (Add, Sub, Mul and Div) to the click-event on the buttons
Use Bootstraps grid-system to layout the component.:
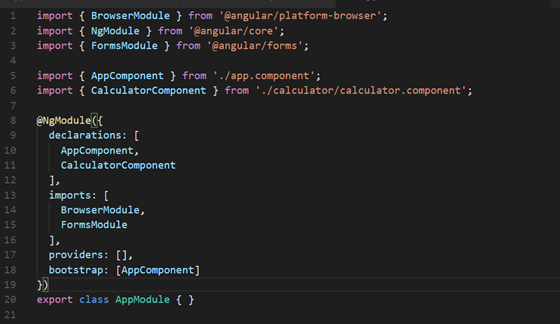
Step 7b - Add import of the FormsModule in app.module.ts
To use input-fields in our app we have to import the FormsModule. Open the app.module.ts file - add the import { FormsModule } from '@angular/forms'; statement and add FormsModule in list of the imports property:
Step 8 Add child-component to the parent-component (RootComponent)
Insert <app-calculator> Loading ... </app-calculator> in the app.component.html file:
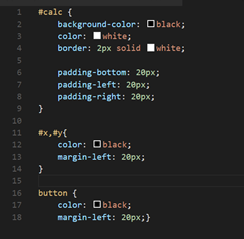
Step 9 - Styling the CalculatorComponent
Add some styling to calculator.component.css file, like:
Step 10
Start the server by running: ng serve to watch the result. It shoud look something like this:
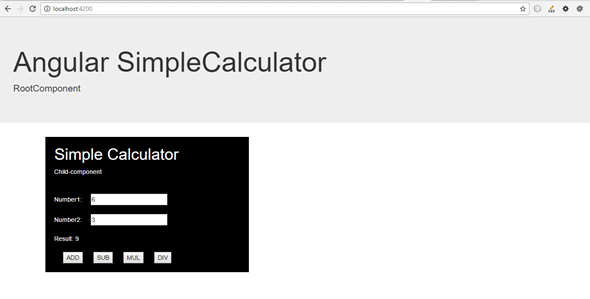
Congratulation! - Angular is still rocking and you have made your second (but still very small) Angular App.
/ Henrik H